Friday, May 29, 2015

DIY Color Block Flower Pots in 5 Steps!


Happy Summer Folks! Well almost, right?

We have almost had to call Noah for his ark to survive here in Dallas, and its put a sure hold on time to get outside painting! I have missed you guys! But, better late than never!

Color Block Pots in 5 Steps…3…2…1…Here we go!


Materials:


  • A few terra cotta clay pots with trays (I HIGHLY recommend Ikea for sizes and prices)
  • A tarp or drop cloth
  • A can of white, flat primer spray paint
  • A few cans of your fave spray paint colors (Be bold!)
  • Painter's Tape
  • A can of shellac or sealant
  • A pencil


Step 1:

Find yourself a few basic terra cotta clay pots. The size is completely up to you. I recommend getting ones with trays if you plan to use them to for real flowers. If you plan to use yours to hold pens or as storage, no trays are needed. We have an Ikea here in Dallas so I went there and found some for a great price and in which the trays were included. 


While you're out, drop in home depot or Lowe's and grab you a few cans of savvy colored spray paint and one can of flat white primer spray paint. I went to Lowe's so I grabbed a $5 Valspar primer and it was awesome.


Place your pots on a tarp or drop cloth and prime your pots. Prime on side. Let them dry 15-20 minutes, then flip them and complete the other side. Lightly prime the inside of the actual pots also.


Step 2

After your pots are primed and DRY, using a pencil, lightly sketch the design or block creation that you are trying to make on your pot. You do NOT have to use the pencil at all if you do not want to. This is art, so there is no wrong design. I personally didnt use a pencil for a lot, but started first by just placing painter's tape on my pot to create the idea that I had in mind. The idea of the entire design is color in mass- color in blocks. So, you don't have to perfectly place apply your tape. See how I positioned my tape below. (If you notice the after photos at the end, I ended up readjusting my smaller design as I was painting. Be flexible, be creative!)


Step 3: 

Spray paint your trays (if you are including trays). I chose to paint my trays solid in a metallic silver by Valspar. 


Then, I spray painted random sections on my clay pots with that same color. Use as much painters tape as you need to cover spots that you want to avoid coloring with that color. Leave that to dry for 25-30 minutes, then do one more light coat. Leave that to dry WELL for 1-2 hours.


After that, once more, spray paint another section on your pot with a different color.(Remember: Use as much painters tape as you need to cover spots that you want to avoid coloring a certain color). Leave that to dry for 25-30 minutes, then do one more light coat.


Touch up any spots with your spray paint as needed. Let your pots dry overnight to make sure that they COMPLETELY dry before you proceed to step 4.


Step 4:


Remove all painters tape, and if you are 100% certain that all of the paint is dry, place tape over the already painted portions of the pot to protect it while you spray the remaining unpainted parts of the pot with a different color. Leave your pot to dry several hours or COMPLETELY. Then, remove all of the painter's tape.


Step 5:

Place your pots and trays on your tarp or drop cloth, and lightly spray them with the sealant of your choice. I went with a water based polyurethane of course, but you can use Shellac or another that your prefer. And……drum roll please…..




Until next time,


Always tag @ahavadesignstx on Instagram, Facebook, Twitter, or Pinterest with photos or feedback from your DIY adventures and completed Ahava projects! We would love to display them and cheer you on! XO


Saturday, May 2, 2015

April Showers Bring May Flowers: 5 Creative Ways to Show Off Those New Blooms


Spring blooms are here and its time to switch up the way you put those little lovelies on display! Atypical is my fave, so I have 5 unique ways to style your flowers this season. Here we go!

1.) Vintage Bird Cages


These are one of the coolest ways to show off those flowers! I went to a local thrift shop and found a cute little hanging bird cage for a whole $2.99. Yes, $2.99. 


I spray painted my little lovely with a gold metallic paint. 


Once it dried, I used a small, organic paper pot to repot my flowers in, and then sat that inside of the bird cage. Carefully string your blooms through the bars of the cage, and use a cute burlap or decorative ribbon to surround the pot in. So stinkin adorable! See my before and finished product photos!


Here are a few others via Pinterest!


2.) Old Drawers Refurbished


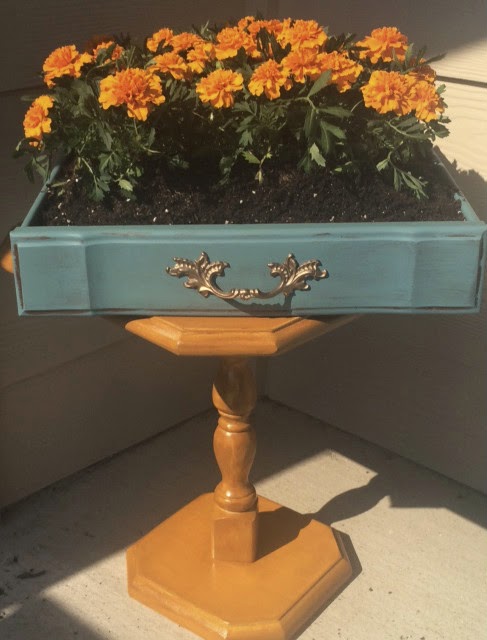
I had an old nightstand that I was unable to refurbish as a whole, but that had perfect drawers that could be salvaged. I removed one, chalk painted it (for help with chalk paint, visit our last post The Alternative to Sanding: 5 Chalk Paint Tips and How-Tos), and then potted my flowers in it. 


BEFORE

You can line it with coconut liner and plant them in that. Or, you can measure the length and width of the drawer and find a flat, plastic tray-like pot to plant them in. Choose a pretty color of the season, a royal blue, a mint green, or a classic fuchsia to paint the drawer, and even change the hardware to something a little more savvier. I used a beautiful spring color by Martha Stewart called Hosta that I made my chalk paint with. You can get it at Lowes. I loved the original hardware, but it needed a touch up. I simply removed it, spray painted it, and put it back on!


 AFTER


REMOVE AND PAINT YOUR HARDWARE. I RECOMMEND A KRYLON PAINT COLOR. I USED A METALLIC GOLD.


The drawers are unique and also depending upon the size and dimensions of them, give nice room for you to fit a generous amount of flowers in them. I think I am going to find a few more drawers to paint to pot some more blooms in this season. Here is the final product!


Here are a few other examples that I found on the net! 


(Top Photo courtesy of funkyinteriors.net)


(Photo courtesy of Pinterest.com)

3.) Vintage China or Kitchenware


I went to a Goodwill store and found a beautiful vintage china gravy bowl and potted my flowers in it. And WOW! The vintage china was in mint condition and honestly I could have left it without paint and it would have still been fabulous. But, I love to paint and I like color. So, I painted mine with a nice silver grey, something neutral that wouldn't distract from my bright flowers.


I have seen some neat ideas on Pinterest also of people planting them in china cups, pitchers, and even colanders. Who knew kitchenware and china could become flower pots?


(Both photos courtesy of Pinterest.com)


4.) Vintage Milk or Tin Cans


I lucked out and got my hands on a vintage milk can, added some color, and planted some of my flowers in it. You do not have to paint them, they are just as cute in their natural vintage state. Here is my milk can creation below.


Another idea that I recommend as far as vintage tin goes, are old tool cans or oil cans. Check out a few other tin can creations flower pot creations.


(Both photos courtesy of Pinterest.com)


5.) Wine Boxes


I decorated/designed for a wedding last year and was given some gorgeous solid wood wine boxes from the bride and groom. As an avid wine connoisseur, it was the perfect gift! 


We served wedding favors in them, but I remember thinking to myself, you could totally plant something in these- how gorgeous would that be? And I have discovered that it indeed is. Use a coconut liner or a shallow plastic pot to settle your flowers in, and then place that inside of the wine box. I didn't want to rot out the wood with moisture and wanted to be able to reuse it for the next bloom. 

Check out a few posted on pinterest!


(Both photos courtesy of Pinterest.com)

So, step outside of the box this season and plant those blooming beauties in something a little spicier! 


What other cool ways have you displayed your flowers? Or what neat things have you ever transformed into flower pots?

Tweet us, snap a photo of it, or post on our page and share @ahavadesignstx

Until Next Time,
XO