Monday, February 10, 2014

Vintage Book Picture Frames


This particular project is one of my absolute FAVES!!! I went to an arts and crafts show almost a year and a half ago and I saw one of these and had to have it. I couldn't quite figure out how they had managed to turn this book into a frame, but I was going to figure it out. I didn't hop on google, I committed to figuring it out myself. So, after a little trial and error and a few hits and misses, it came out a little better than I even anticipated. And it was easy peasy- 5 steps to be exact!

Materials:
-A vintage or nostalgic hard back book
-Scissors
-Hair Dryer
-Ruler
-Hot glue gun
-Exacto Knife
-One sheet of card stock
-A tube of E6000 glue adhesive 
-Aleene's or Elmer's spray adhesive
-Pen or pencil
-A paper crafting flower or embellishment
-Modge Podge
-A foam brush
-Rubber bands
-A large binder clip or two
-A sheet of card stock or hearty paper

While this project requires quite a few materials, let me reassure you that it is going to be worth it! 

Before we can get started, you must first find yourself a vintage or antique hard back book. You may have some of your own lying around, or you may have to do as I did and go to your local resale, thrift, or book store that resells used books. I chose to go to Half Price Books and they actually have a nostalgic book section. Some of them were super pricey, while others, like mine, were very reasonable and in good condition. I chose a medium size book with a bright teal cover and solid pages. It is imperative that your cover is durable and in good condition, as you will need it to be strong enough to cut on. Also, make sure that the pages are sturdy, and not falling apart. You will be cutting the pages as well, and they must be strong enough to endure the cutting process and remain in tact for the most part. 


Step 1: Decide what size picture that you are creating this frame for. Using your card stock, a pen or pencil, and a ruler, measure and create a pattern the size of your photo. The most common sizes are 4X6 and 5X7. I always print photos from my phone or camera in the 4X6 size, so that's what I selected. Once you have finished creating and have cut out your pattern, flip open the front cover of your book and trace the pattern onto the back of the cover. (You can also just trace it on the front of the cover, but it is just a bit more risky in that you can make a flaw during cutting that could be hard to patch up. Whereas on the back of the cover, you have more room for error.)


AN EXTRA STEP IF THE SPINE OF YOUR BOOK IS A LITTLE WOBBLY
(In a well ventilated area (-AKA- outdoors) and wearing a durable pair of rubber gloves, use the E6000 tube of glue to seal the binding if it happens to be detached in any way at all. Just squeeze it into the peek a boo holes if they exist on the spine, and then press it down to make sure that the glues adheres. Then, use a hair dryer on high to help better seal and dry it.)


Step 2: Carefully use your exact knife to cut the pattern out that you traced onto the cover earlier. DO NOT RUSH THROUGH THIS STEP! It is so important that you focus on safety and precision here. Once you have successfully severed the cover completely, remove the portion of the cover that you cut out. Then, take 25-30 pages behind that cover, and use a binder clip to hold them together; leaving approximately 80% of the remaining pages. Then, with the 80% portion of the pages, using your adhesive glue spray, glue the back page to the back cover, and continue, 2-4 pages at a time, spraying and gluing them together. Continue this process until you have glued all of the pages together. Secure a rubber band or binder clips on them to hold them in place as they dry. Use your hair dryer on high to seal and dry. Next, do the same thing with the remaining 20% of the pages in the binder clip. But, keep both sections of pages separate for now (We will put them all together later).


Step 3: At this point, 20% of your book is glued together, and the other 80% is glued together. Keep them separated still and put an old magazine or thin book in between them for the rest of this step. With the 20% portion of the pages that are adhered to the front cover, use your Exacto knife to sever the pages also in the shape and pattern that you have cut out in the cover. As I stated earlier during a cutting portion of the project, DO NOT RUSH THROUGH THIS STEP! It is imperative that you slowly cut through the pages, as you do not want to damage them or cause them to look rough or raggedy. Once you  have cut the pages, and both the cover and the 20% of the pages are hollow, use a hair dryer to blow out the dust that may have come from cutting the pages. Use your Exacto knife to trim rough edges and smoothen the edges of the pages and cover. Now, where the front 20% of the book and the back 80% are divided, use your E6000 and a foam brush and secure those two portions together. I highly advise E6000 for this as you do not want your book separating. And if you know anything about E6000, anything put together by it, no man can separate ha! Rubber band the book good to hold it in place and to seal it. I let mine then sit for almost one hour to dry really, really good. 


Step 4: Leave the rubber bands in place, and along the bottom edges of the pages and the side edges (NOT ALONG THE TOP OF THE BOOK JUST YET), paint on a coat or two of original Modge Podge. Let it dry for 20-30 minutes, and then repeat this step once more. 


Now, your pages at the top of your book have NOT been painted with Modge Podge just yet, and this is on purpose. Remove your rubber bands from around the book. Grab your pattern that you created earlier and manipulate it in through the top where the pages have not been Modge Podged until it comfortably slides all the way through the front and is exposed in the photo slot on the cover. If you have trouble sliding it through, I recommend using your Exacto knife along the edges of the top to slightly enlarge the slot to slide the photo through and to make an easy entrance and exit for your photos in and out of the frame. Once it slides in and out comfortably, leave your pattern in there and leave a little of it peaking through the slot at the top. Take your Modge Podge and foam brush that you used earlier and paint the edges of those pages now also (paint on a coat or two of original Modge Podge, let it dry for 20-30 minutes, and then repeat this step once more). Wrap rubber bands around your book, and leave your book for 2-3 hours to completely dry.


Step 5: Remove the pattern from the photo slot (If done correctly, this should slide out very easy). Use your Exacto knife to fine tune and smooth out things if needed on the cover or on the severed page edges. If and when all is smooth enough, Use your hot glue gun to adhere your paper craft flower or embellishment onto the spot of your choice on the cover. Then, grab that favorite photo of yours and slide it on in through the top. Exhale, smile, and pat yourself on the back, girlfriend!


You did it again in 5 easy steps!

Until next time,

Check us out on Facebook:
www.facebook.com/ahavadesignstx

Follow us on Twitter:
@ahavadesignstx

Shop us:
www.etsy.com/shop/ahavadesignstx

And of course subscribe to our blog:
ahavadesignstxdiy.blogspot.com


Monday, February 3, 2014

Ahava Thrift Store Month: How-To Redesign Thrift Store Lamps


February is thrift month for Ahava Designs TX and every single one of this month's posts will be centered around thrift store items revamped! As I have said before, Ahava Designs TX thrives in the redesign and restoration of vintage and antique lighting and home furnishings, so naturally I spend much time in resale and thrift stores; and I love it! Nothing that I sell, with the exception of the handmade lamp shades, is brand new. Everything has been thrifted and was purchased as an antique and then restored and redesigned- EVERYTHING!! And one of my favorite thrift store items to hunt are lamps. They are usually in resale shops in masses, overlooked and untouched. But let me tell you, there are so many lamps that are absolute treasure finds that with a little TLC, can be reinvented to jazz up any room's lighting! Here's How!

QUICK DISCLAIMER AND IMPORTANT THINGS TO KNOW:
I never pay more than $10 for a thrift store or resale lamp, period. In addition to that, I always judge the potential of the lamp, focusing on such things as these:
  • Can the base be redesigned or repainted and it look good? What does the original material that it is made of look like? cracks or chips? ceramic or wood?
  • What do the electrical gadgets look like? Are they extremely aged and damaged? Is the cord in tact? I NEVER NEVER NEVER purchase lamps where the electrical business looks out of business. If the cord has any cuts or stray wires, leave it. Your safety is #1.
  • Has it been redesigned or repainted before? If I can tell that a lamp has been redesigned or repainted already, I leave it. I want it in its original state, as sometimes when something is redesigned or repainted already, you can over do it and this could cause it to look tacky, the new design not to look like you planned, or safety risks as far as the electrical component is concerned if its coated for days in paint.

Ok, let's dive in!

Step 1:
The first step is simply thrifting and finding the perfect lamp for you. Don't worry if the shade looks shady! You are focused more on the base, as a shade can be tossed or replaced easily. Assess it once again for durability, electrical safety, and redesign potential. Remove the lamp shade if there is one, as well as any harps and finials that may have attached the shade to the actual lamp base.


Step 2:
Using painters tape, tape over the cords, making sure that you cover every inch. I like to place a quart size ziplock over my cord, and then tape it closed with the painters tape. Also, cover the fitter, the knob that turns it one, and the spot that holds the bulb tightly and completely with the painters tape. Please make sure that this is covered in its entirety, as if paint gets in these areas, it is not recommended for use. Paint is flammable.


Step 3: 
Once you have covered those areas sufficiently with your painter's tape and nothing but the base is exposed, place it on a plastic tarp or canvas of some sort on top of a hard surface and in a well ventilated area (outdoors). Then, spray your base with a good primer. After the primer dries, choose the spray paint color that you wish to makeover your base with and cover it thoroughly, following the directions on the can. Let it dry outdoors, and then take a look over it to make sure that you have not missed any spots, touch it up if need be, and if not finish the paint process by spraying your base with a top coat or clear sealant.


Step 4:
After several hours and when the paint is completely dry, remove the painters tape carefully from the electrical components and the cord. Double check the felt on the bottom and make sure that it is in tact also. If it is, great! If not, simply purchase an adhesive sheet of felt from your local craft store, sit your base on it, trace the bottom, and cut and adhere the new felt. 


Step 5:
Depending upon what the shade looked like, decide whether or not you will salvage it or trash it. If there are cuts in the shade, whether on the outside or in the enterior, pitch it; as when the light is turned on, any flaws or imperfections will show through. If the print is ugly, no worries. You can cover them with fabric or search for a cool DIY idea similar to some of the ones that we featured late last year to make them over (http://ahavadesignstxdiy.blogspot.com/2013/11/a-garage-sale-100-lamp-shade-turned.html.) Or, you can simply splurge and buy a new one. Because you will have saved so much on the base of the lamp, you have room to splurge when it comes to the shade. But, whatever shade you choose, choose something fun, unique, and that fits the style and flavor that you are looking for.

And voila! You will have done it again, you DIY diva you- DIY in 5 easy steps! 

Until next time, 

Monday, January 27, 2014

5 Uncanny DIY Coffee Can Craft Ideas


Greetings Folks!

Ok this one is going to be fun, so let's dive right in! I love coffee! I like to think of myself as a coffee connoisseur of sorts. So, drinking lots of coffee leaves many empty coffee cans around my house. And as these cans have accumulated, I have refused to throw them away. The crafter in me knew that they could be revived into something, and something fun! So, after playing around a little bit, I have picked 5 of my favorite, trendiest craft ideas that you can try too! 

1.) A Vase or Centerpiece


I do lots of event decorating and planning, and one of the touches I aspire to add to every occasion is uniqueness and rarity in the decor. I don't pick typical things to decorate my events, but I like to hop outside of the box and shake up the conventional just a tad. These tin cans, whether coffee or tea, wrapped in sisal rope, and accented with a lovely little floral piece or trinket, becomes the most shabby chic centerpiece or vase for your table or shelf space. You can drop a few cute faux flowers in it, a little water and some real ones, or even reeds of sorts to make this fun little lovely add that extraordinary touch to that decor. 


(Remove the label and using a hot glue gun, wrap the sisal rope around the can from top to bottom.)


2.) Office Supply Holders


I picked a burlap ribbon and adhered it to my can all the way around using a low temp hot glue gun. I then selected the cutest scrapbook, silk flower and glued it onto the front. I use these beauties for cool and savvy desk accessories to hold my pens, markers, scissors, etc. 


3.) Chalkboard Canisters

With a few coats of chalkboard paint, turn your can into a chalkboard canister. Add seasonal spices, snacks, or goodies of your choice to them. And then, when you run out of something and decide to fill up the canister with something new, simply erase what used to be in there, and replace it with the name of your newest spice. How convenient, fun, and simple, eh? These are sure to be a hit!


(Use a chalkboard paint and a foam brush to paint the can with. Use 2-3 coats.)


4.) Plastic or Trash Bag Dispenser


I will not even try to claim this one as my original creation, I was "secondspired" (inspired secondhand)! Spray paint your coffee can or paint it by hand as crafty and crazy as you would like. Then, take the lid to your can, cut a 1- 1 1/2 inch long and .25 in wide slit in the top of it and then paint it as well. Next, use foam letters or a stencil to label your bag dispenser, and then load your bags inside, pulling the first out through the top of the dispenser once the lid is secured on. I chose to add chalkboard paint to mine so that I could write on it, but it is up to you.

Now you don't have to look at those plastic grocery store bags collect messily in the bottom of the pantry or those trash bags just laying there in that ugly roll. Conceal them and make them easy to keep organized!


(Spray paint your can your favorite color. I am a huge fan of Rustoleum spray paints, as they are so rich in color and the coverage and quality are fantastic. Use an exacto knife to cut an opening in the lid to pull your bags through.)


5.) Candle Holders


I coffee stained a few old music pages, cut them to fit around my can, glued them on with craft glue, and then secured them with modge podge. After the Modge Podge dried, I adhered a flat burlap ribbon around the top to add a little detail, and then finished it off with two pastel accent flowers in lime and teal. Original and super cute…I will take that!


Until next time,


Tuesday, January 14, 2014

5 DIY Table Top Transformation Ideas

Hey folks!

As I have told you all before, I am an avid thrifter and "dumpster diver". For me, the older and more shabby something looks, the more I am drawn to it. I love to pick up those things that the vendor is basically trying to get rid of, especially old tables. My company thrives in taking vintage and antique home furnishings and redesigning them into new and improved pieces, and the tables are absolute hits! People rave about them, but many times they have no idea what they looked like before we got our hands on them. In some cases, the entire table needs a little laying on of hands, but more often than not, it's simply a cause for some table top rehab. A scratch, a water stain, or maybe the kids got to it with a crayon, either way, just because the tops a little scarred doesn't mean that the whole thing is ruined. So if the bottom is great, try just revamping the top!

Here are 5 of my favorite DIY techniques that you can try to makeover those damaged, ugly table tops.

1.) Chevron

With a roll of painter's tape, a can of color infused solid stain, and a foam brush, you can create a trendy chevron table top and completely modernize what was once old and dull! Touch up the legs if you need to, then find you a great paint color that will look great on top of your table, and have your paint color made into a solid color stain. I will let you in on my biggest "design secret": I do not use regular paint on any of my wood furnishings. I use stains infused with color. The coverage is not only better, but it allows for the color to look more natural on the wood. Home depot does it best!

Tape your table in the chevron pattern and make your chevrons as wide or as narrow as you wish. Then, with your foam brush, paint on the non-taped areas, let it dry for half an hour or so, then paint over it once more. Once your second coat has dried, remove the tape and VOILA! You can then touch up as needed and then seal your creation with a polyurethane or shellac finish and you're done!


Here are a few outstanding examples from pinterest that will inspire you to try it!


(Photo courtesy of http://www.latdah.blogspot.com/2012/04/chevron-coffee-table.html?m=1)


(Photo courtesy of http://www.vivaciouslyvintage.com/2012/04/teal-white-chevron-coffee-table-take-2.html)

2.) Script Stencils

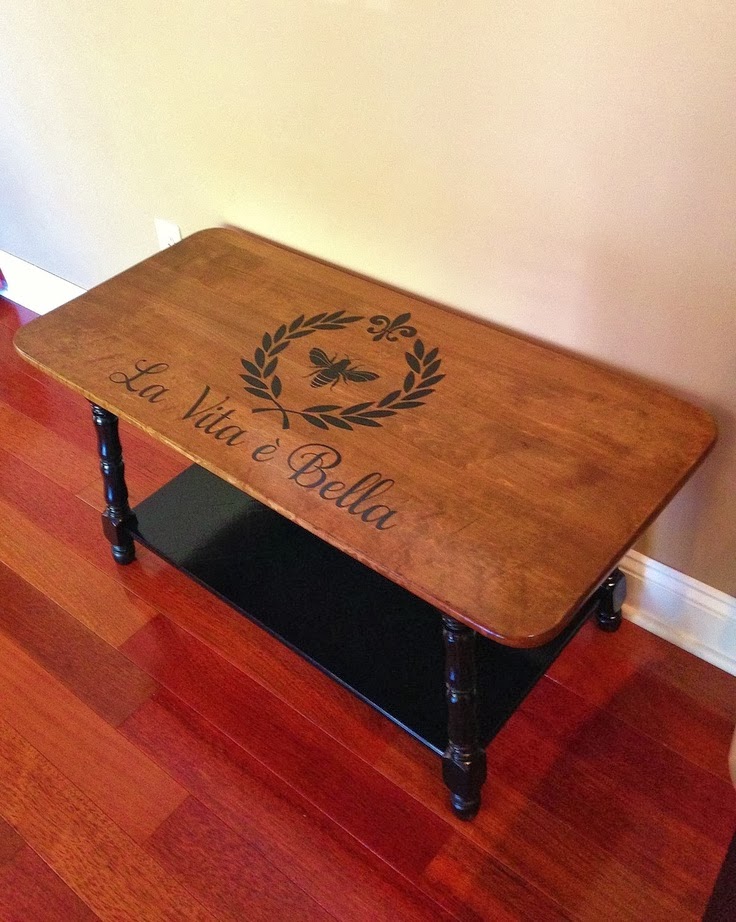
This is an easy and a fun one. Most craft stores carry the large, savvy little wall quotes or stencils that allow you to paint quotes and images on walls without having to do it all freehand. Pick up one of those  stencils and using your favorite color paint stain, paint it on your old table top and make it new! This is not only a quick and easy project, but it is also very unique and personal, as you can put as many words that you want, your personal favorite words, or even designs or images of your choice.

Here is a personal design sample, and one that I have deemed an all time favorite.


And another


Here is a beautiful, but sold out, design from an etsy artist


(Photo courtesy of Pinterest - http://www.pinterest.com/pin/342414377890155271/)

Ok ok, one more from one of my favorites, Funky Junk Interiors


(Photo courtesy of Funky Junk Interiors - http://www.funkyjunkinteriors.net/?b2w=http://funkyjunkinteriors.blogspot.com/2010/10/how-to-make-table-top-sign-with-story.html)


3.) Chalkboard Paint


Sand that bad boy down and cover it with two coats of chalkboard paint! The chalkboard paint is not just a hit for the kiddos, but has become quite a staple for those of all ages. Who doesn't like the freedom to express themselves a little bit? It can add a very vintage and classic flare to your furnishing and to your room. When I see the chalkboard paint on table tops among shabby chic decor, I automatically resort to classic diner menus or the scene from The Color Purple where the older sister is teaching her baby sister how to read and is writing words all over the house. And of course, it can just make you feel like a kid again!
(Photo courtesy of Ahava Designs TX- This was a design of mine)


Here is a wonderful example from Pinterest


(Photo courtesy of Pinterest-  http://www.pinterest.com/pin/42643527694817023/ )


4.) Scrapbook Pages or Wall Paper

After sanding your table top down to an even surface, adhere wall paper or high quality scrapbook paper to your table top. When I first was introduced to this concept, I thought, "How cheap will that look!" Well, I ate my words once I was finished. The table turned out beautiful and my friends and family fell in love with it. With the wall paper, adhere it to the table top following the exact instructions that you would when adhering it to the wall. For the scrapbook pages, use a good glue adhesive spray to secure the pages down. Let them dry good, and then seal them down with classic Modge Podge. Once the first coat has dried, coat it a second time. I then wait 8-10 hours, and after that, I go in and seal the table top with polyurethane. I recommend using water based polyurethane for this particular project, as I have found from projects in the past, when it comes to papers- scrapbook or wall, the oil soaks into the paper and overall the project just does not come out very good at all. You do not need to apply tons of polyurethane, just enough to seal it securely.


This is an Ahava Design of my own.


Here is a great wallpaper table from apartment therapy.com


(Photo courtesy of http://www.apartmenttherapy.com/look-wallpapered-table-50059)


5.) Securing an Old Serving Tray to the Top

Go to your local resale shop or garage sale and locate one of the old fashioned, antique serving trays, that is about the same size as the top of your table. It is ok for the tray to be slightly bigger than the table top, but definitely not much smaller than it. Then, depending on the material of the tray, either discretely attach the tray in each of the four corners with small nails to the top of the table. If the tray cannot be nailed to the table top or is made of a delicate material, use a super adhesive such as E-6000 or a great, heavy duty substitute, and adhere the tray to the table top. E-6000 is one that I absolutely live by and I have never had any project fall apart with it. But, make sure that you definitely use it in a very well ventilated area (AKA outdoors) and that you use gloves for sure. If you opted to nail your tray to your table, make sure that you either paint over the nails with the color matching the tray, or modge podge something on the surface of your tray that would make the nail heads less noticeable or more discreet.


(Photo courtesy of Pinterest - http://www.pinterest.com/pin/124974958383551993/ )


Here are a few other fun examples:


(Photo courtesy of Pinterest- http://www.pinterest.com/pin/290622982175424332/)


(Photo courtesy of http://kabamfamily.blogspot.com/2013/05/have-you-had-enough-of-french-post-mark.html)


There is no such thing as a few scratches or water spots ruining a perfectly good table in my book! If the legs are still nice, let your creative juices flow and fix the top! You never know, you just might create a new masterpiece before you know it!

Until next time,

Follow us:
www.facebook.com/ahavadesignstx
www.twitter.com/ahavadesignstx

Shop us:
www.etsy.com/shop/ahavadesignstx

Inquire or let us transform your trash into treasures:
ahavadesignstx@yahoo.com

Sunday, January 5, 2014

A New Hue, A New You: 5 Great Paint Colors to Refresh your Spaces for 2014

Happy New Year, Folks! 2014 is here- a new year, and many things afresh! Typically we just 
focus on weight and habits as areas of change for the new year, but sometimes a shift in your 
atmosphere or in the space around you can bring about a refreshing change too. 

Do you have boring white walls that you are so over? Or maybe some boring taupe ones that 
you just cannot stand to look at for another year? Or perhaps even a hideous wall paper that 
just simply must go bye bye? Well, pack their bags because plain and boring aren't welcomed 
anymore! If you are opting to bring change to every other area of your life, why not bring it to 
your living area? Or dining area? Adding new wall color is often just the touch needed to 
reinvent that room space! A new hue, a new you!

Here is a list of 5 of the colors that I deem trendsetters and staples for this new year, and that 
if you are looking for a new hue, you just might love! 


1.) Indigo
Color Energy: relaxation, renewal


Indigo is one of the hottest new color trends out in paint and home decor. It is a classic, but one
with lots of pizazz and flavor! Try an indigo accent wall, as shown above in the UK's popular, 
Sunday Times interior design feature. Set it off with neutral furnishings and linens, or 
accessorize outside of the box with colors such as coral or mint green! Check out these great 
designs by Better Homes and Gardens.


2.) Gray
Color Energy: space and more space


Grays enlarge your space. Try your favorite of the many shades of gray, there are way more 
than fifty, and add depth and enlarge your space. Grays open up the room and are the perfect 
neutral to pair up with other fun colors each season with its versatility! The photo above, 
courtesy of decor pad.com, shows off  Benjamin Moore's popular color- Galveston Gray, and 
paired with a fun yellow and white! 

Here is a very well done gray bathroom space done by Shea McGee interior designs. 


3.) Yellow
Color Energy: joy and serenity


When you think yellow, think sun! Yellow, from light shades to darker ones, are fun and add 
brightness to any room! Yellows are bold, but paired with warmer colors, such as red oranges, 
or even neutrals such as gray, they can be toned down and can transform spaces into 
contemporary, fashion-statement-makers.

Here is another beautiful example from the amazing Elle Decor!


4.) Orchid
Color Energy: playful, yet sophisticated


Purple is a color symbolic for royalty. And when I see orchid, I think atypical purple, atypical 
class and elegance! This shade of purple is a beauty, and isn't too subtle and not too over the 
top! Try pairing orchid with a chocolate brown and mustard golds, or combining it with darker 
gray or pewter furnishings! Check out the fun room display above from Benjamin Moore.


5.) Turquoise
Color Energy: vacation, rejuvenation


Ok so we have a few months or so before good, yummy summer vacation begins! But no need to
fret, a little turquoise added to that office space or tv room space paired with a little frozen 
drink and you just might mistake it for a day on the beach! There are countless, beautiful 
shades of turquoise that you can go with! Start light if you don't want to go too extreme, too 
fast. Any hue will do! Pair your turquoise with a few of my personal favorite other color buddies 
such as: navy, coral, orchid, chocolate, khaki, or alongside color duos such as gray and white or 
black and white. The photo above was a beautiful design done by Style at Home. And 
Designshuffle.com and inspire bohemia did an amazing job with these lovely turquoise 
splashed spaces!


So, you have a little over 360 days left of this year to go bold! Start with one of these five ways!

Until next time,


www.etsy.com/shop/ahavadesignstx
www.facebook.com/ahavadesignstx
www.twitter.com/ahavadesignstx